imageSource抽象了访问数据的任务,它解决了我们自己从内存原始缓冲区中去管理数据的需求。一个imageSource可以包含一个甚至多个图像,缩略图,每一个图像的属性和图像文件。如果我们在工作中用到了图像数据并且程序是运行在OS X v10.4及其以后的,imageSource将会是把图像数据转移到程序中的首选方式。在创建了CGImageSource对象之后,便可以获取图像、缩略图、图像属性和一些其他的图像信息。具体使用方法见CGImageSource Reference中的描述。
由ImageSource创建一个Image
一个最为常见的任务就是使用Image I/O的方式通过一个imageSource来创建一个image。就像下面展示的例子那样,这个例子给我们展示怎样通过一个路径名字来创建一个imageSource并提取图像。当我们创建了一个imageSource对象,我们可以为该图像源文件提供一个格式的相关提示。
当我们使用imageSource来创建一个图像时,必须要指定一个索引,而且还可以提供一个用于指定是否创建缩略图或者是否运行缓存的属性字典(键值对)。CGImageSource Reference和CGImageProperties Reference列出了所有的key和这些key对应支持的数据类型。
而且我们需要提供一些索引值(index),因为有些图像文件格式允许多个图像同时存在于一个相同的源文件中。对于一个图像源文件只包含一个图像时,索引值传入0。如果想要知道一个图像源文件包含了多少个图像,我们调用函数CGImageSourceGetCount来获取。
CGImageRef MyCreateCGImageFromFile (NSString* path)
{
    // Get the URL for the pathname passed to the function.
    NSURL *url = [NSURL fileURLWithPath:path];
    CGImageRef        myImage = NULL;
    CGImageSourceRef  myImageSource;
    CFDictionaryRef   myOptions = NULL;
    CFStringRef       myKeys[2];
    CFTypeRef         myValues[2];

    // Set up options if you want them. The options here are for
    // caching the image in a decoded form and for using floating-point
    // values if the image format supports them.
    myKeys[0] = kCGImageSourceShouldCache;
    myValues[0] = (CFTypeRef)kCFBooleanTrue;
    myKeys[1] = kCGImageSourceShouldAllowFloat;
    myValues[1] = (CFTypeRef)kCFBooleanTrue;
    // Create the dictionary
    myOptions = CFDictionaryCreate(NULL, (const void **) myKeys,
                   (const void **) myValues, 2,
                   &kCFTypeDictionaryKeyCallBacks,
                   & kCFTypeDictionaryValueCallBacks);
    // Create an image source from the URL.
    myImageSource = CGImageSourceCreateWithURL((CFURLRef)url, myOptions);
    CFRelease(myOptions);
    // Make sure the image source exists before continuing
    if (myImageSource == NULL){
        fprintf(stderr, "Image source is NULL.");
        return  NULL;
    }
    // Create an image from the first item in the image source.
    myImage = CGImageSourceCreateImageAtIndex(myImageSource,
                                           0,
                                           NULL);

    CFRelease(myImageSource);
    // Make sure the image exists before continuing
    if (myImage == NULL){
         fprintf(stderr, "Image not created from image source.");
         return NULL;
    }

    return myImage;
}
使用imageSource来创建缩略图
有些图像源文件包含了缩略图像,我们可以直接获取。但是如果当前的图像源文件中不存在的话,Image I/O给我们提供了一些选项来创建它们。当缩略图应用在图像变换时,我们还可以指定缩放尺寸。
下面的代码展示了如何去从data来创建一个imageSource,设置和缩略图相关选项参数的字典并创建一个缩略图。我们可以使用kCGImageSourceCreateThumbnailWithTransform来指定缩略图的旋转角度和缩放比例以适配整个图像的朝向和像素长宽比。
CGImageRef MyCreateThumbnailImageFromData (NSData * data, int imageSize)
{
    CGImageRef        myThumbnailImage = NULL;
    CGImageSourceRef  myImageSource;
    CFDictionaryRef   myOptions = NULL;
    CFStringRef       myKeys[3];
    CFTypeRef         myValues[3];
    CFNumberRef       thumbnailSize;

   // Create an image source from NSData; no options.
   myImageSource = CGImageSourceCreateWithData((CFDataRef)data,
                                               NULL);
   // Make sure the image source exists before continuing.
   if (myImageSource == NULL){
        fprintf(stderr, "Image source is NULL.");
        return  NULL;
   }

   // Package the integer as a  CFNumber object. Using CFTypes allows you
   // to more easily create the options dictionary later.
   thumbnailSize = CFNumberCreate(NULL, kCFNumberIntType, &imageSize);

   // Set up the thumbnail options.
   myKeys[0] = kCGImageSourceCreateThumbnailWithTransform;
   myValues[0] = (CFTypeRef)kCFBooleanTrue;
   myKeys[1] = kCGImageSourceCreateThumbnailFromImageIfAbsent;
   myValues[1] = (CFTypeRef)kCFBooleanTrue;
   myKeys[2] = kCGImageSourceThumbnailMaxPixelSize;
   myValues[2] = (CFTypeRef)thumbnailSize;

   myOptions = CFDictionaryCreate(NULL, (const void **) myKeys,
                   (const void **) myValues, 2,
                   &kCFTypeDictionaryKeyCallBacks,
                   & kCFTypeDictionaryValueCallBacks);

  // Create the thumbnail image using the specified options.
  myThumbnailImage = CGImageSourceCreateThumbnailAtIndex(myImageSource,
                                          0,
                                          myOptions);
  // Release the options dictionary and the image source
  // when you no longer need them.
  CFRelease(thumbnailSize);
  CFRelease(myOptions);
  CFRelease(myImageSource);

   // Make sure the thumbnail image exists before continuing.
   if (myThumbnailImage == NULL){
         fprintf(stderr, "Thumbnail image not created from image source.");
         return NULL;
   }

   return myThumbnailImage;
}
渐进图片加载
当存在一个很大的图片,或者通过web的方式来加载图像数据,我们可能希望创建一个递增的imageSource来积累这些图像数据。我们需要执行如下这些任务来递增渐进地由CFData对象加载图像:
- 创建一个用于积累图像数据的CFData对象。
- 通过调用CGImageSourceCreateIncremental递增地创建一个imageSource。
- 把图像数据添加到
CFData对象中。 - 调用CGImageSourceUpdateData函数,传递该CFData对象和一个用于指定数据(data)参数是否包含了完整图像的Boolean值(或者只是图像数据的一部分)。不管在任何情况下,该数据(data)参数必须包含到目前为止所有的图像文件数据。
- 如果积累了整个图像数据,调用CGImageSourceCreateImageAtIndex函数来创建图像,画出局部图像,并在之后的某个时刻去释放它。
- 通过调用CGImageSourceGetStatusAtIndex函数来确认是否获取了图像的所有数据。如果获取完成,该函数会返回
kCGImageStatusComplete(它是CGImageSourceStatus枚举类型的一个值)。如果尚未完成,重复步骤3和步骤4. - 释放递增的图像源。
显示图像属性
数码照片会对图像上标记大量有关图像尺寸,分辨率,方向,颜色配置文件,光圈,测光模式,焦距,创建日期,关键字,标题等信息。在只有数据暴露在用户界面中的情况下,这些信息在图像处理和编辑时非常有用。尽管CGImageSourceCopyPropertiesAtIndex函数可以在一个imageSource关联的属性字典中获取相关数据,我们仍然需要编写代码来遍历该字典来展示相关信息。
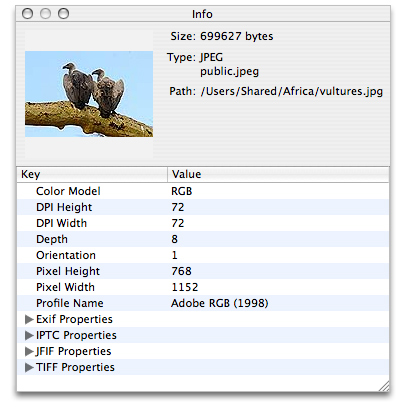
在这一节我们需要来仔细看看OSX上一个ImageApp的样例代码,该程序是关于图像显示相关的,我们可以把它下载下来并尝试一下。该程序其中一个功能便是一个用来展示当前活跃图像的像信息展示的窗口,包括了一个缩略图和图像属性,下方有相关代码。

我们可以在ImageInfoPanel.h和ImageInfoPanel.m文件中查看详细的实现过程;也可以去查看nib文件怎么设置window绑定的。想要知道在程序中是怎么使用CGImageSource相关的函数来编辑图像,可以查看下放的代码,在代码的后面就是对实现具体讲解。(注意这并不是独立的一个功能点,所以苹果告诉我们不能简单地直接复制到我们自己的项目中,它只是ImageApp样例的一小段儿)
- (void) setURL:(NSURL*)url
{
    if ([url isEqual:mUrl])
        return;

    mUrl = url;

    CGImageSourceRef source = CGImageSourceCreateWithURL((CFURLRef)url, NULL);            // 1
    if (source)
    {
        NSDictionary* props =
           (NSDictionary*) CGImageSourceCopyPropertiesAtIndex(source, 0, NULL);           // 2
        [mTree setContent:[self propTree:props]];                                         // 3
        NSDictionary* thumbOpts = [NSDictionary dictionaryWithObjectsAndKeys:
            (id)kCFBooleanTrue, (id)kCGImageSourceCreateThumbnailWithTransform,
            (id)kCFBooleanTrue, (id)kCGImageSourceCreateThumbnailFromImageIfAbsent,
            [NSNumber numberWithInt:128], (id)kCGImageSourceThumbnailMaxPixelSize,
            nil];                                                                         // 4
        CGImageRef image = CGImageSourceCreateThumbnailAtIndex(source, 0,
                                      (CFDictionaryRef)thumbOpts);                        // 5
        [mThumbView setImage:image];                                                      // 6
        CGImageRelease(image);                                                            // 7
        [mFilePath setStringValue:[mUrl path]];                                           // 8

        NSString* uti = (NSString*)CGImageSourceGetType(source);                          // 9
        [mFileType setStringValue:[NSString stringWithFormat:@"%@\n%@",
                        ImageIOLocalizedString(uti), uti]];                               // 10

        CFDictionaryRef fileProps = CGImageSourceCopyProperties(source, nil);             // 11
        [mFileSize setStringValue:[NSString stringWithFormat:@"%@ bytes",
            (id)CFDictionaryGetValue(fileProps, kCGImagePropertyFileSize)]];              // 12
    }
    else                                                                                  // 13
    {
        [mTree setContent:nil];
        [mThumbView setImage:nil];
        [mFilePath setStringValue:@""];
        [mFileType setStringValue:@""];
        [mFileSize setStringValue:@""];
    }
}
下面来解释一下这些代码都干了些啥:
1、通过传入一个URL的方式来创建一个imageSource对象。
2、在索引值为0的地方拷贝图像属性。有些图片格式支持不止一个图像,但是在例子中假设只有单张图片(或者我们感兴趣的图像总是在文件中的第一个)。CGImageSourceCopyPropertiesAtIndex函数返回一个CFDictionary对象。在例子中使用NSDictionary对象来替换CFDictionary,因为这些数据类型都是通用的(有时候可能需要桥接一下)。
该返回值字典包含了属性的键值对。然而一些值它们自身就是包含的属性的字典。看上图展示的那样,它们不仅仅只是简单的键值对,还有比如exif、jptc、jfif等属性包含了其他值的字典。我们有时可能需要这些属性并把它们展示出来,这正是下一步需要做的事儿。
3、在ImageInfoPanel.h文件中,从字典中获取属性并整理成树形结构(NSTreeController),其中mTree变量是从InterfaceBuilder中outlet出来的一个NSTreeController对象。该控制器管理着一个对象树。在这里,它是一个图像属性的对象。
propTree方法由ImageInfoPanel.m文件中提供,它的目的是遍历上一步(第2步)中属性字典,提取相应的属性并构建一个绑定在NSTreeController对象的数组。
4、构建一个选项字典,并在由imagesource创建图像时使用。通过传入一个字典来重新调用那些选项。使用这些选项创建的缩略图,指定了该缩略图被旋转、缩放等朝向和长宽比。如果缩略图不存在时便会创建一个,它最大的像素尺寸是128x128([NSNumber numberWithInt:128], (id)kCGImageSourceThumbnailMaxPixelSize)。
5、由imageSource来创建一个缩略图,使用的选项是由上一步(第6步)设置。
6、把缩略图设置到是infoPanel的视图中。
7、不再需要该图像时释放它
8、提取URL的路径并作为参数传递给方法,把字符串设置到与textfield绑定的绑定的消息面板中。
9、获取imageSource的UTI(这会因为图像的不同有所差异)
10、调用函数来获取关于UTI的本地字符串(ImageIOLocalizedString声明在ImagePanel.m源文件中),并把字符串设置到与textfield绑定的绑定的消息面板中。
11、提取与imageSource相关联的属性字典。这些属性书可用于容器(比如文件大小),不一定是imageSource中的单个图像。
12、把从上一步获取的imageSource属性字典中的文件大小值提取出来,然后把字符串设置到与textfield绑定的绑定的消息面板中。
13、如果图像源并未被创建,确保在界面上的所有字段反应出相应的情况。