接下来的几个部分会展示怎样在Cocoa和Core Foundation中创建不同类型的输入源。
3.4.1 定义自定义输入源
创建自定义输入源需要包含到以下几点:
- 输入源需要处理的信息;
- 交互:使得对输入源感兴趣的client知道怎样和其进行交互;(别人需要知道怎么和它的交互,scheduler)
- 处理请求:能够处理其他client发送的请求;(处理别人的请求,handler)
- 取消:有能够使输入源失效的程序;(disable input source,cancellation)
通过创建自定义输入源来处理相关信息,实际的配置就应该设置相对灵活一点。上诉2,3,4点是在自定义输入源是比较关键的点。
定义一个机制通过输入源把数据传递给其他线程来达到线程间通信的目的。
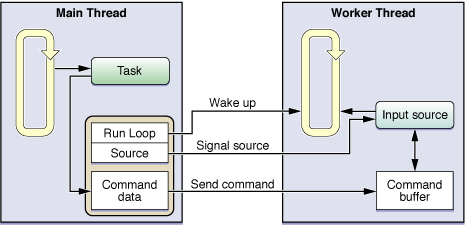
下图展示了对自定义输入源相对来说比较简单的配置,由程序的主线程来维护着和输入源的联系。为输入源自定义一个commond buffer,此时输入源对应的Runloop默认已经初始化完成。当主线程有一个和工作线程交互的任务时,通过commond buffer传递一个包含了工作线程需要开始执行任务的命令。(因为主线程和输入源对应的工作线程都可以访问这个commond buffer,由此对该数据的访问操作必须要保证是同步执行的)一旦这个命令发出,主线程示意输入源唤醒工作线程的Runloop。收到这个唤醒的命令之后,Runloop调用输入源的Handler(处理程序),处理在commond buffer中的命令。
3.4.1.1 定义输入源
我先根据我的理解画一个图:

定义自定义输入源的时候我们需要使用CoreFoundation来配置Runloop的Source,并将Source添加到Runloop中。尽管是基于C的函数,但是并不是排除需要我们使用Objective-C或者C++来把这些函数封装起来。
我们使用Objective-C对象来管理对于上图中的commond buffer,也用来协调Runloop(3.4.1.2 协调Clients的输入源)。下面代码中定义了RunLoopSource类,RunloopSource对象管理着commond buffer,通过buffer来接收其他线程的消息。同样也定义了RunLoopContext类,它是一个容器对象(上下文),被用于传递RunLoopSource对象,并让Runloop和程序主线程联系起来。
@interface RunLoopSource : NSObject{
    CFRunLoopSourceRef runLoopSource;
    NSMutableArray *commands;
}

- (instancetype) init;
- (void) addToCurrentRunloop;
- (void)invalidate;

/// Handler method
- (void)sourceFired;


/// Client接口 处理注册命令
- (void)addCommad:(NSInteger)commad withData:(id)data;
- (void)fireAllCommandsOnRunloop:(CFRunLoopRef)runloop;

/// 在自定义输入源的开头说了创建自定义输入源需要包含的四点中后面三点,这是在创建RunLoopSource时三个不同时刻的回调函数
void RunLoopSourceScheduleRoutine (void *info, CFRunLoopRef rl, CFStringRef mode);
void RunLoopSourcePerformRoutine (void *info);
void RunLoopSourceCancelRoutine (void *info, CFRunLoopRef rl, CFStringRef mode);

@end


//// context

@interface RunLoopContext : NSObject{
    CFRunLoopRef runLoop;
    RunLoopSource *source;
}

@property(readonly) CFRunLoopRef runloop;
@property(readonly) RunLoopSource *source;

- (id)initWithSource:(RunLoopSource *)src andloop:(CFRunLoopRef)loop;

@end
尽管Objective-C代码管理着输入源的自定义数据,但是我们使用基于C的回调函数(RunLoopSourceScheduleRoutine,RunLoopSourcePerformRoutine,RunLoopSourceCancelRoutine)。当初始化CFRunLoopSourceContext时会用到这几个回调函数(下面的代码)。由于这个输入源只有一个client(主线程),所以我们在程序中使用scheduler函数(RunLoopSourceScheduleRoutine)来发送消息,让它(RunloopSource)在AppDelegate中注册。delegate可以使用RunLoopContext对象来和输入源通信。
/// RunLoopSourceScheduleRoutine
void RunLoopSourceScheduleRoutine (void *info, CFRunLoopRef rl, CFStringRef mode){
    RunLoopSource *obj = (__bridge RunLoopSource *)info;
    AppDelegate *adg = (AppDelegate *)[UIApplication sharedApplication].delegate;
    RunLoopContext *rl_context = [[RunLoopContext alloc] initWithSource:obj andloop:rl];
    [adg performSelectorOnMainThread:@selector(registerSource) withObject:rl_context waitUntilDone:NO];
}
最重要的回调之一是当输入源发出信号(CFRunLoopSourceSignal)时,需要处理这些数据。下面的代码是和RunloopSource对象关联的回调函数,这个函数的作用只是将要做的事转交给sourceFired方法(因为在定义CFRunLoopSourceContext变量时回调函数是基于C的,而我们通常的习惯使用Objective-C的方法),所有需要处理的命令都在command buffer(commands成员变量)中:
void RunLoopSourcePerformRoutine (void *info){
    RunLoopSource *obj = (__bridge RunLoopSource *)info;
    [obj sourceFired];/// 存在的意思是什么?当主线程传来需要重复多次的耗时任务时,我们就可以该函数中进行相关的计算工作(因为这是次级线程的RunloopSource)
}
使用CFRunLoopSourceInvalidate函数将输入源从Runloop中移除,系统会调用输入源的撤销函数(RunLoopSourceCancelRoutine)。我们通过这个函数来通知主线程当前输入源已经不再可用,它们需要移除任何和输入源有关的东西。下面代码是RunLoopSource对象相关的撤销回调函数,这个函数向application delegate传递其RunLoopContext对象,但是这时候要让delegate移除和RunloopSource的联系。
void RunLoopSourceCancelRoutine (void *info, CFRunLoopRef rl, CFStringRef mode){
    RunLoopSource *obj = (__bridge RunLoopSource *)info;
    AppDelegate *adg = (AppDelegate *)[UIApplication sharedApplication].delegate;
    RunLoopContext *rl_context = [[RunLoopContext alloc] initWithSource:obj andloop:rl];
    [adg performSelectorOnMainThread:@selector(removeSource:) withObject:rl_context waitUntilDone:NO];
}
3.4.1.2 为Runloop初始化输入源
下面代码实现了RunLoopSource类的init和addToCurrentRunloop方法。init方法创建了一个CFRunLoopSourceRef类型的变量并将它添加到Runloop中。将RunLoopSource对象自己作为上下文(context),在该对象的context创建时传入了一个函数指针。要等到工作线程调用addToCurrentRunLoop方法之后输入源才开始初始化,即RunLoopSourceScheduleRoutine函数回调之后。当输入源添加到Runloop之后,该线程便可以运行Runloop或者让它处于休眠状态。
- (instancetype)init{
    /**
    typedef struct {
        CFIndex    version;
        void *    info;
        const void *(*retain)(const void *info);
        void    (*release)(const void *info);
        CFStringRef    (*copyDescription)(const void *info);
        Boolean    (*equal)(const void *info1, const void *info2);
        CFHashCode    (*hash)(const void *info);
        void    (*schedule)(void *info, CFRunLoopRef rl, CFRunLoopMode mode);
        void    (*cancel)(void *info, CFRunLoopRef rl, CFRunLoopMode mode);
        void    (*perform)(void *info);
    } CFRunLoopSourceContext;
    */
    self = [super init];
    if (self) {
        ///retain release copyDescription这三个函数指针,在“使用Runloop对象”一节中配置RunloopObserver时写给,这里就不写了直接传入NULL
        CFRunLoopSourceContext context = {0,(__bridge void *)(self),NULL,NULL,NULL,NULL,NULL,RunLoopSourceScheduleRoutine,RunLoopSourceCancelRoutine,RunLoopSourcePerformRoutine};
        runLoopSource = CFRunLoopSourceCreate(kCFAllocatorDefault, 0, &context);/// 关于这个初始化器怎么选择同样在“使用Runloop对象”一节中配置RunloopObserver提到过
        commands = [NSMutableArray array];
    }
    return self;
}

- (void) addToCurrentRunloop{
    CFRunLoopAddSource(CFRunLoopGetCurrent(), runLoopSource, kCFRunLoopDefaultMode);
}
3.4.1.2 协调Clients的输入源
我的理解:把下文提到的Clients想象成线程。
为了能够让输入源可用,我们需要让它从其他线程发出信号。当处于无事务需要处理时我们必须要将输入源处于休眠状态。而且要让程序中其他次级线程知道有这个输入源并且能够和它进行通信的方式。
当输入源在Runloop中第一次初始化完成之后,我们可以通过发送一个注册请求来通知Client。既可以为很多的client注册输入源,也可以只注册到一些很重要的client。
- (void)registerSource:(RunLoopContext*)sourceInfo{/// 注册source时回调出来的objective-c方法

}

- (void)removeSource:(RunLoopContext*)sourceInfo{/// RunLoopSourceCancelRoutine函数指针回调出来的objective-c方法

}
我们可以在上诉两个方法中作为其他线程和输入源的通信地点(上诉这两个方法在3.4.1.1中)。
3.4.1.3 输入源信号(Signaling the Input Source)
在将数据转交给输入源之后,client必须向source发出信号并唤醒Runloop。向source发出信号并让Runloop做相关的处理事务。当信号到达时,线程有可能是处于休眠状态,所以我们需要来唤醒Runloop(达到唤醒线程的目的)。否则可能导致延迟处理输入源。
- (void)fireAllCommandsOnRunloop:(CFRunLoopRef)runloop{
    CFRunLoopSourceSignal(runLoopSource);
    CFRunLoopWakeUp(runloop);
}
当他们准备好处理添加到commond buffer中的相关命令时来调用这个方法。
我们应该避免通过自定义输入源来处理SIGHUP或者其他进程级别的信号。唤醒Runloop的CoreFoundation函数在发送信号时是不安全的,所以不要在处理信号相关的程序中使用。
3.4.2 配置定时器源
创建timer source,唯一需要做的就是创建一个timer对象并在Runloop中调度处理相关事务。在Cocoa中,使用NSTimer创建timer对象,在CoreFoundation中使用CFRunLoopTimerCreate创建CFRunLoopTimerRef类型变量。实际上NSTimer只是CoreFoundation的一个扩展并提供一些便捷的方法。
在Ccocoa中,一次性创建并调度定时器时使用下面两个类方法:
scheduledTimerWithTimeInterval:target:selector:userInfo:repeats:scheduledTimerWithTimeInterval:invocation:repeats:
上面这两个方法创建了定时器并添加到当前线程的默认mode (NSDefaultRunLoopMode)中,但是我们也可以自己通过NSRunLoop的实例方法addTimer:forMode:来将NSTimer对象添加到其他mode中。
/// 分开处理,我们可以通过更多的自定义方式来处理timer,比如添加到不同的NSDefaultRunLoopMode。
NSDate *futureDate = [NSDate dateWithTimeIntervalSinceNow:1.0];
NSTimer *myTimer = [[NSTimer alloc] initWithFireDate:futureDate interval:0.1 target:self selector:@selector(timedothing:) userInfo:nil repeats:YES];
[[NSRunLoop currentRunLoop] addTimer:myTimer forMode:NSDefaultRunLoopMode];
/// 将创建和调度同时进行
[NSTimer scheduledTimerWithTimeInterval:0.2 target:self selector:@selector(timedothing:) userInfo:nil repeats:YES];
下面的例子是用CoreFoundation来配置定时器。更多的使用事项CFRunLoopTimer Reference见。
/**
typedef struct {
    CFIndex    version;
    void *    info;
    const void *(*retain)(const void *info);
    void    (*release)(const void *info);
    CFStringRef    (*copyDescription)(const void *info);
} CFRunLoopTimerContext;
*/
CFRunLoopTimerContext context = {0,NULL,NULL,NULL,NULL};
CFRunLoopTimerRef timer = CFRunLoopTimerCreate(kCFAllocatorDefault, 0.1, 0.3, 0, 0, timercallback, &context);
CFRunLoopAddTimer(CFRunLoopGetCurrent(), timer, kCFRunLoopDefaultMode);

void timercallback(CFRunLoopTimerRef timer ,void *info){/// callback

}
3.4.3 配置基于端口输入源(Port-based Input Source)
Cocoa和Core Foundation都提供了基于端口实现线程和进程间通信的方法。接下来我们会学习如何创建不同类型的端口来实现通信。
3.4.3.1 配置NSMachPort对象
为了能和NSMachPort对象建立本地连接,需要创建端口对象并将其添加到主线程的Runloop中。当启动次级线程时将这些对象添加到线程入口函数里。此时次级线程便可以发送消息到主线程中。(这里有两个线程,主线程和次级辅助线程,具体的操作是创建端口对象,第一步将对象放在主线程的Runloop中,第二步在次级辅助线程的入口点函数中添加该端口对象)。
一、实现主线程代码
/// 官方文档代码例子
- (void)launchThreadForPort{

    NSPort *port = [NSMachPort port];
    if (!port) {
        return;
    }
    [port setDelegate:self];
    [[NSRunLoop currentRunLoop] addPort:port forMode:NSDefaultRunLoopMode];
    [NSThread detachNewThreadSelector:@selector(detachThread:) toTarget:self withObject:nil];
}
上面代码展示了在主线程上启动一个次级辅助线程。Cocoa系统提供了许多步骤来配置端口和Runloop,这和CoreFoundation中的方法要简短很多,但是结果却是很相似的。唯一不同点就是该方法不是将本地端口的名称发送给工作线程,而是直接发送给NSPort对象。
为了能够在线程之间建立双向通信的通道,在消息处理(check-in message)的时候需要将工作线程的本地端口发送到主线程中。接收该消息可以让主线程知晓,能够顺利的启动次级线程,并能够让我们向该线程发送消息。
下面的例子展示了主线程的handlePortMessage:方法。当数据到达线程自己的本地端口时调用。当接收到处理消息(check-in message)时,该方法直接从端口消息中检查辅助线程的端口,并保存起来以备后来使用。
/// 官方文档代码例子
#define kCheckinMessage 100

- (void)handlePortMessage:(NSPortMessage *)portMessage{
    unsigned int message = [portMessage msgid];
    NSPort* distantPort = nil;

    if (message == kCheckinMessage){
        // 获取工作线程的通信端口
        distantPort = [portMessage sendPort];

        // 保存相关信息
        [self storeDistantPort:distantPort];
    }else{
        // Handle other messages.
    }
}
二、实现辅助次级线程代码
在次级线程中我们必须要配置线程并使用特定的端口来和主线程通信。
下面的例子展示了怎样来创建一个工作线程。为线程创建自动释放池之后,这个方法创建一个工作线程对象来驱动线程执行。
/// 官方文档代码例子
+(void)LaunchThreadWithPort:(id)inData
{
    NSAutoreleasePool*  pool = [[NSAutoreleasePool alloc] init];

    /// 创建当前线程和主线程的通信
    NSPort* distantPort = (NSPort*)inData;

    MyWorkerClass*  workerObj = [[self alloc] init];
    /// 这个方法在下一个例子中,它会为工作线程创建一个本地端口,并回送check-in消息到主线程。
    [workerObj sendCheckinMessage:distantPort];
    [distantPort release];

    do
    {
        [[NSRunLoop currentRunLoop] runMode:NSDefaultRunLoopMode
                            beforeDate:[NSDate distantFuture]];
    }
    while (![workerObj shouldExit]);

    [workerObj release];
    [pool release];
}
当使用NSMachPort,本地和远程线程可以使用相同的端口对象来进行线程间通信。换句话说,由一个线程创建一个本地端口对象可以成为其他线程的远程端口对象(对于该线程来说是本地端口(local port),对于其他线程来说则是远程端口对象)。
下面展示了辅助线程的check-in方法。这个方法创建了它自己的本地端口并将消息回送到主线程中。
/// 官方文档代码例子
- (void)sendCheckinMessage:(NSPort*)outPort
{
    // Retain and save the remote port for future use.
    [self setRemotePort:outPort];

    // Create and configure the worker thread port.
    NSPort* myPort = [NSMachPort port];
    [myPort setDelegate:self];
    [[NSRunLoop currentRunLoop] addPort:myPort forMode:NSDefaultRunLoopMode];

    // Create the check-in message.
    NSPortMessage* messageObj = [[NSPortMessage alloc] initWithSendPort:outPort
                                         receivePort:myPort components:nil];

    if (messageObj)
    {
        // Finish configuring the message and send it immediately.
        [messageObj setMsgId:setMsgid:kCheckinMessage];
        [messageObj sendBeforeDate:[NSDate date]];
    }
}
3.4.3.2 配置NSMessagePort对象
为了能够和NSMessagePort对象建立本地连接,我们就不能简单地通过在线程之间传递对象了。远程消息端口必须是通过名称来获取的。在Cocoa中需要使用特定的名称来注册本地端口,然后将该名称传递给远程线程,以便它可以和适当的端口对象通信。
下面例子展示了端口创建和注册以及使用端口:
/// 官方文档代码例子
NSPort *localoPort = [[NSMessagePort alloc] init];
[localoPort setDelegate:self];

[[NSRunLoop currentRunLoop] addPort:localoPort forMode:NSDefaultRunLoopMode];

NSString *portName = [NSString stringWithFormat:@"myPortName"];

///NSMessagePortNameServer 仅仅只能在macOS 10.0+中使用
[[NSMessagePortNameServer sharedInstance] registerPort:localPort
                                                      name:portName];
3.4.3.3 在CoreFoundation中配置Port-based输入源
这部分展示了在程序中使用CoreFoundation在主线程和工作线程之间怎样创建双边通信的通道。
在工作线程中创建一个CFMessagePortRef类型变量来鉴定消息,工作线程需要知道端口名称来进行通信,在命名端口名称时需要时唯一的。
/// 官方文档代码例子
OSStatus MySpawnThread(){
    CFStringRef portName;
    CFMessagePortRef myPort;
    CFRunLoopSourceRef rlSource;
    CFMessagePortContext context = {0, NULL, NULL, NULL, NULL};
    Boolean shouldFreeInfo;

    portName = CFStringCreateWithFormat(kCFAllocatorDefault, NULL, CFSTR("com.myApp.MainThread"));

    myPort = CFMessagePortCreateLocal(kCFAllocatorDefault, portName, &MainThreadResponseHandler, &context, &shouldFreeInfo);

    if (myPort == NULL) {
        return;
    }

    rlSource = CFMessagePortCreateRunLoopSource(kCFAllocatorDefault, myPort, 0);

    if (rlSource) {

        CFRunLoopAddSource(CFRunLoopGetCurrent(), rlSource, kCFRunLoopDefaultMode);

        CFRelease(myPort);
        CFRelease(rlSource);
    }

    MPTaskID        taskID;
    return(MPCreateTask(&ServerThreadEntryPoint,
                        (void*)myPortName,
                        kThreadStackSize,
                        NULL,
                        NULL,
                        NULL,
                        0,
                        &taskID));
}

/// typedef CFDataRef (*CFMessagePortCallBack)(CFMessagePortRef local, SInt32 msgid, CFDataRef data, void *info)
CFDataRef MainThreadResponseHandler(CFMessagePortRef local, SInt32 msgid, CFDataRef data, void *info){

}
主线程可以等到端口初始化完成而且线程已经启动之后执行。当消息到达之后,它被调度到主线程的MainThreadResponseHandler函数中。该函数获取工作线程的端口名称,并创建通信通道。
/// 官方文档代码例子
#define kCheckinMessage 100

// Main thread port message handler
CFDataRef MainThreadResponseHandler(CFMessagePortRef local,
                    SInt32 msgid,
                    CFDataRef data,
                    void* info){
    if (msgid == kCheckinMessage){
        CFMessagePortRef messagePort;
        CFStringRef threadPortName;
        CFIndex bufferLength = CFDataGetLength(data);
        UInt8* buffer = CFAllocatorAllocate(NULL, bufferLength, 0);

        CFDataGetBytes(data, CFRangeMake(0, bufferLength), buffer);
        threadPortName = CFStringCreateWithBytes (NULL, buffer, bufferLength, kCFStringEncodingASCII, FALSE);

        // You must obtain a remote message port by name.
        messagePort = CFMessagePortCreateRemote(NULL, (CFStringRef)threadPortName);

        if (messagePort){
            // Retain and save the thread’s comm port for future reference.
            AddPortToListOfActiveThreads(messagePort);

            // Since the port is retained by the previous function, release
            // it here.
            CFRelease(messagePort);
        }

        // Clean up.
        CFRelease(threadPortName);
        CFAllocatorDeallocate(NULL, buffer);
    }
    else
    {
        // Process other messages.
    }

    return NULL;
}
/// 官方文档代码例子
OSStatus ServerThreadEntryPoint(void* param)
{
    // Create the remote port to the main thread.
    CFMessagePortRef mainThreadPort;
    CFStringRef portName = (CFStringRef)param;

    mainThreadPort = CFMessagePortCreateRemote(NULL, portName);

    // Free the string that was passed in param.
    CFRelease(portName);

    // Create a port for the worker thread.
    CFStringRef myPortName = CFStringCreateWithFormat(NULL, NULL, CFSTR("com.MyApp.Thread-%d"), MPCurrentTaskID());

    // Store the port in this thread’s context info for later reference.
    CFMessagePortContext context = {0, mainThreadPort, NULL, NULL, NULL};
    Boolean shouldFreeInfo;
    Boolean shouldAbort = TRUE;

    CFMessagePortRef myPort = CFMessagePortCreateLocal(NULL,
                myPortName,
                &ProcessClientRequest,
                &context,
                &shouldFreeInfo);

    if (shouldFreeInfo)
    {
        // Couldn't create a local port, so kill the thread.
        MPExit(0);
    }

    CFRunLoopSourceRef rlSource = CFMessagePortCreateRunLoopSource(NULL, myPort, 0);
    if (!rlSource)
    {
        // Couldn't create a local port, so kill the thread.
        MPExit(0);
    }

    // Add the source to the current run loop.
    CFRunLoopAddSource(CFRunLoopGetCurrent(), rlSource, kCFRunLoopDefaultMode);


    /// 这个以上部分在前面提到过,主要看这后面的内容
    // Once installed, these can be freed.
    CFRelease(myPort);
    CFRelease(rlSource);

    // Package up the port name and send the check-in message.
    CFDataRef returnData = nil;
    CFDataRef outData;
    CFIndex stringLength = CFStringGetLength(myPortName);
    UInt8* buffer = CFAllocatorAllocate(NULL, stringLength, 0);

    CFStringGetBytes(myPortName,
                CFRangeMake(0,stringLength),
                kCFStringEncodingASCII,
                0,
                FALSE,
                buffer,
                stringLength,
                NULL);

    outData = CFDataCreate(NULL, buffer, stringLength);

    CFMessagePortSendRequest(mainThreadPort, kCheckinMessage, outData, 0.1, 0.0, NULL, NULL);

    // Clean up thread data structures.
    CFRelease(outData);
    CFAllocatorDeallocate(NULL, buffer);

    // Enter the run loop.
    CFRunLoopRun();
}
ServerThreadEntryPoint函数为工作线程的入口点函数,该函数提取主线程的端口名称,并用它来创建一个和远程主线程的连接,该函数为它自己创建了一个本地端口,然后将端口添加到线程的Runloop中,并向包含本地端口的主线程发送check-in消息。
本人总结TIPS
- 通过输入源把数据传递给其他线程来达到线程间通信的目的;
- 当处于无事务需要处理时我们必须要将输入源处于休眠状态;
- 当信号到达时线程有可能是处于休眠状态,所以我们需要来唤醒Runloop(达到唤醒线程的目的);
- 我们应该避免通过自定义输入源来处理SIGHUP或者其他进程级别的信号。唤醒Runloop的CoreFoundation函数在发送信号时是不安全的,所以不要在处理信号相关的程序中使用;
- 我们在使用NSTimer的schedule类方法时他们是自动添加到当前线程默认Mode中;
为了能够在线程之间建立双向通信的通道,在消息处理的时候需要将工作线程的本地端口发送到主线程中;
本地和远程线程可以使用相同的端口对象来进行线程间通信;
远程消息端口必须是通过名称来获取的;
在命名端口名称时需要时唯一的;